Parking Sensor Project
 Sensor Website
Project Overview
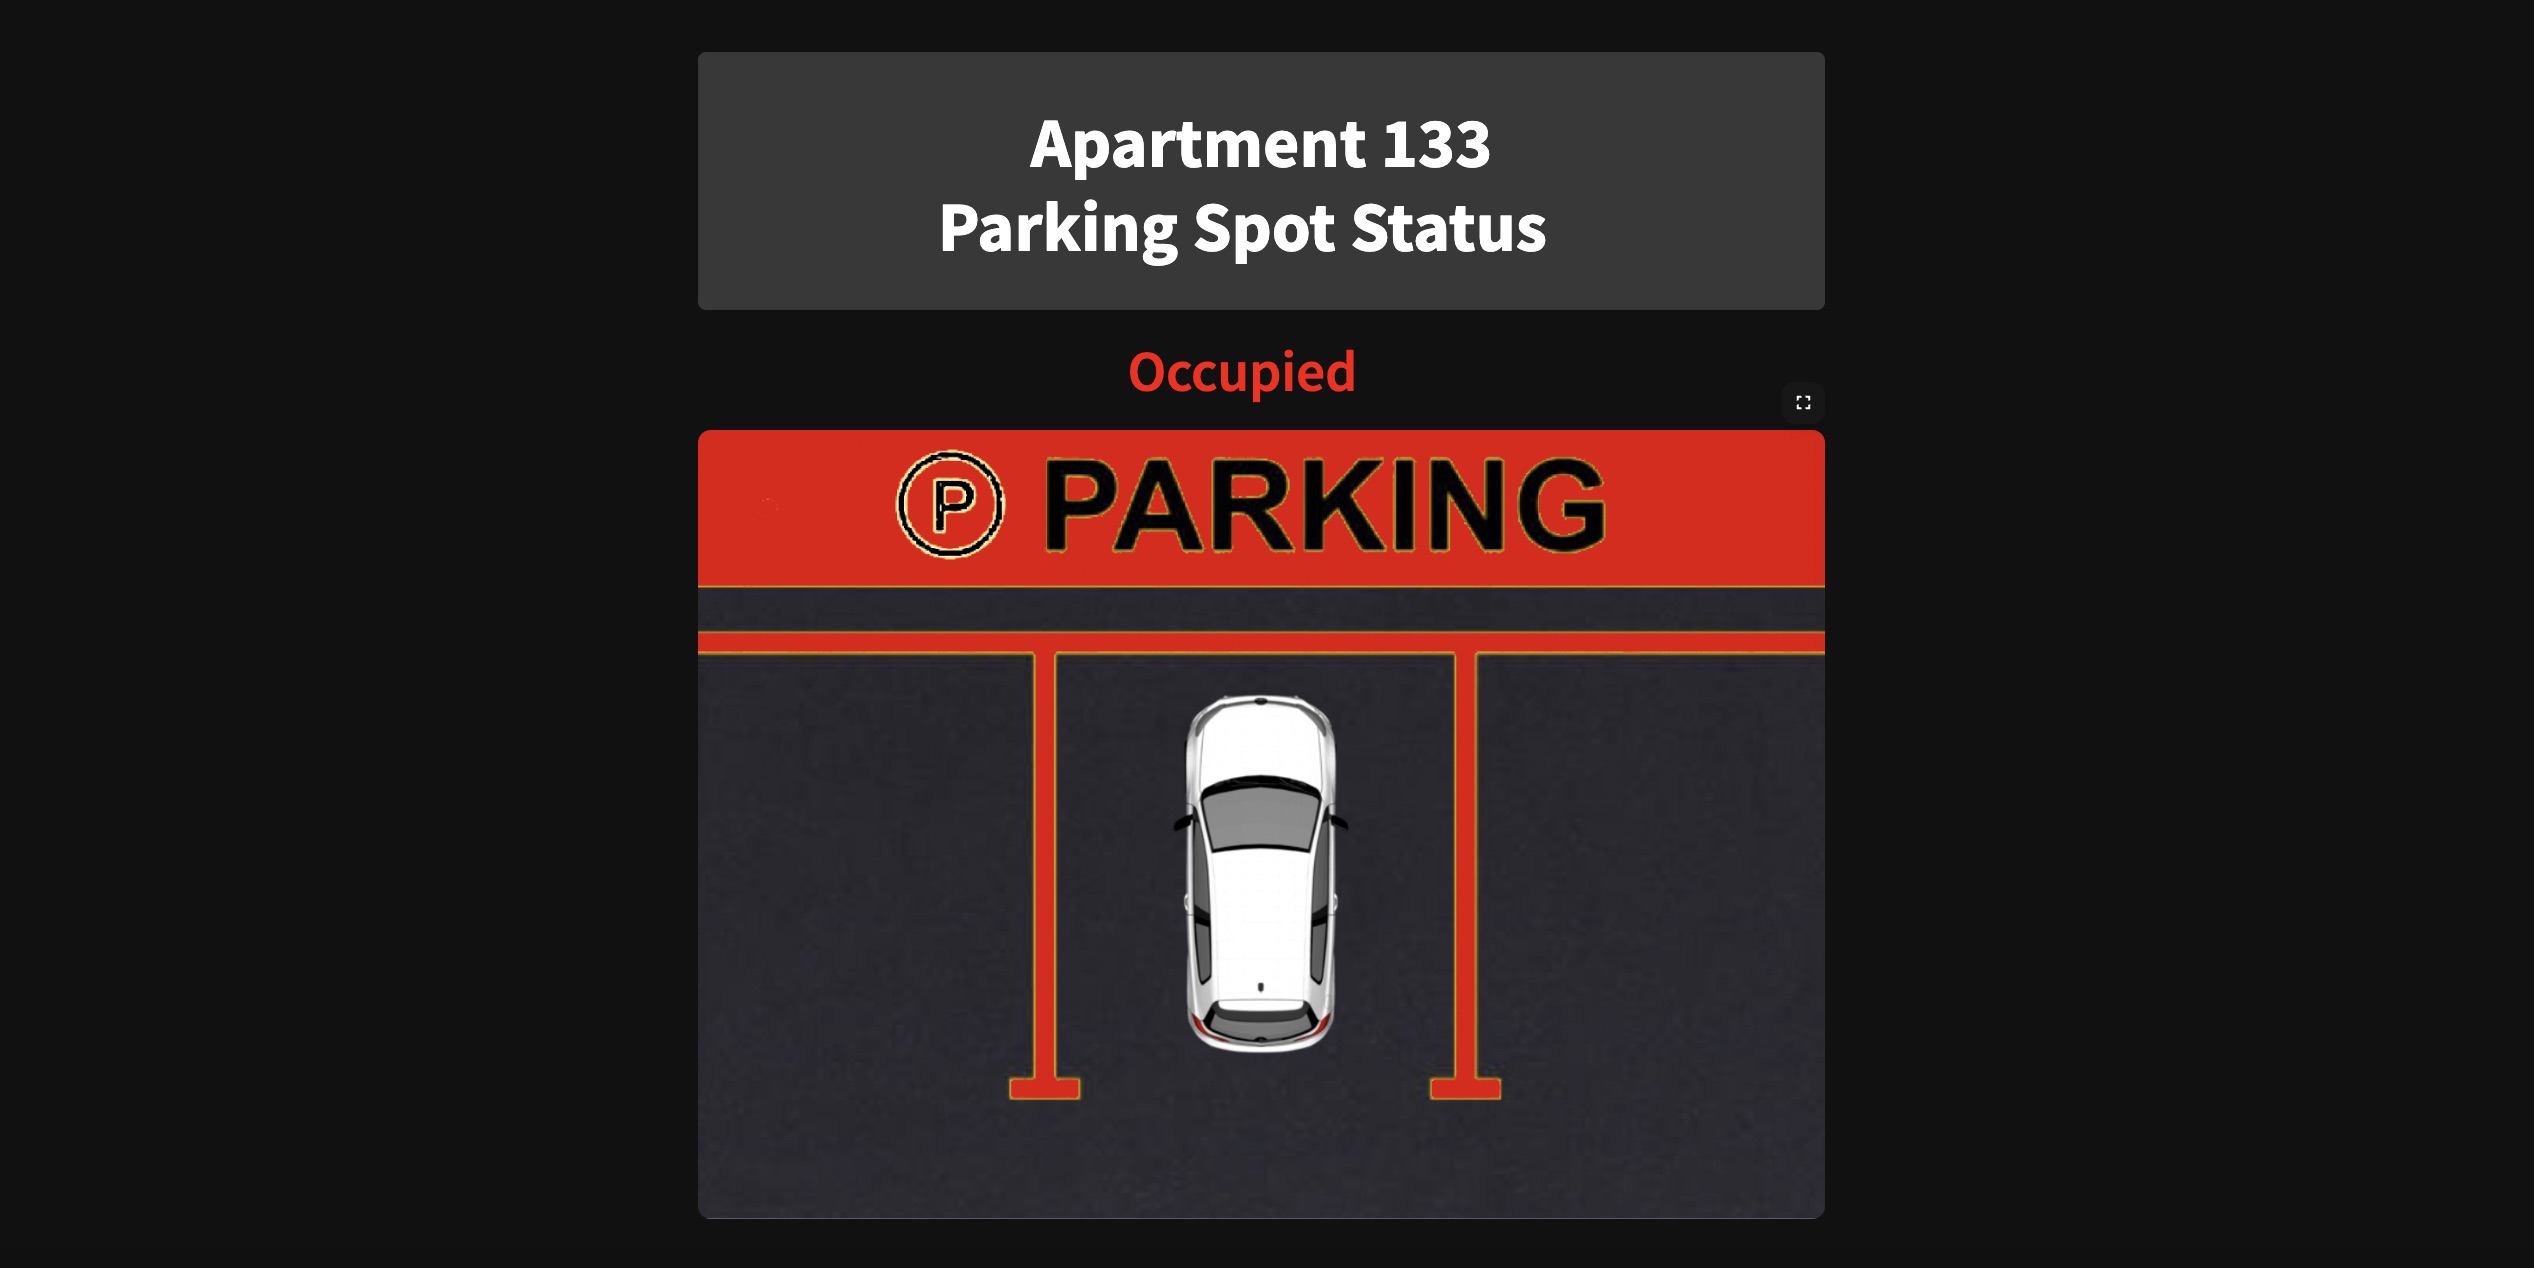
The goal of this project was to create a real-time parking spot monitoring system for my apartment. This was my first major electronics project so I wanted to keep the concept simple, ensuring I would be able to complete the full development process instead of getting stuck on one aspect. This project uses a Pi Pico W to collect distance information from a sensor. The system then uses an MQTT-based communication protocol to publish the distance information to my Raspberry Pi 5, which hosts a website displaying the status of our parking spot.
This project had 5 primary sections:
- Sensor Hardware Design
- Sensor Software Design
- MQTT Broker Configuration
- MQTT Subscriber and Website Design
- Case Design
MQTT Protocol Terminology
- Publisher - This is a device or app that sends messages. For example, a distance sensor that sends distance readings.
- Subscriber - This is a device or app that receives messages. For example, a dashboard that wants to display the distance.
- Broker – The middleman. This is a server that handles all the messages. Publishers send messages to the broker, and the broker sends them to all subscribers who are interested.
- Topics – Messages are labeled with a topic. Subscribers tell the broker what topics they care about (like Pico1/distance), and the broker only sends them matching messages.
Hardware Components
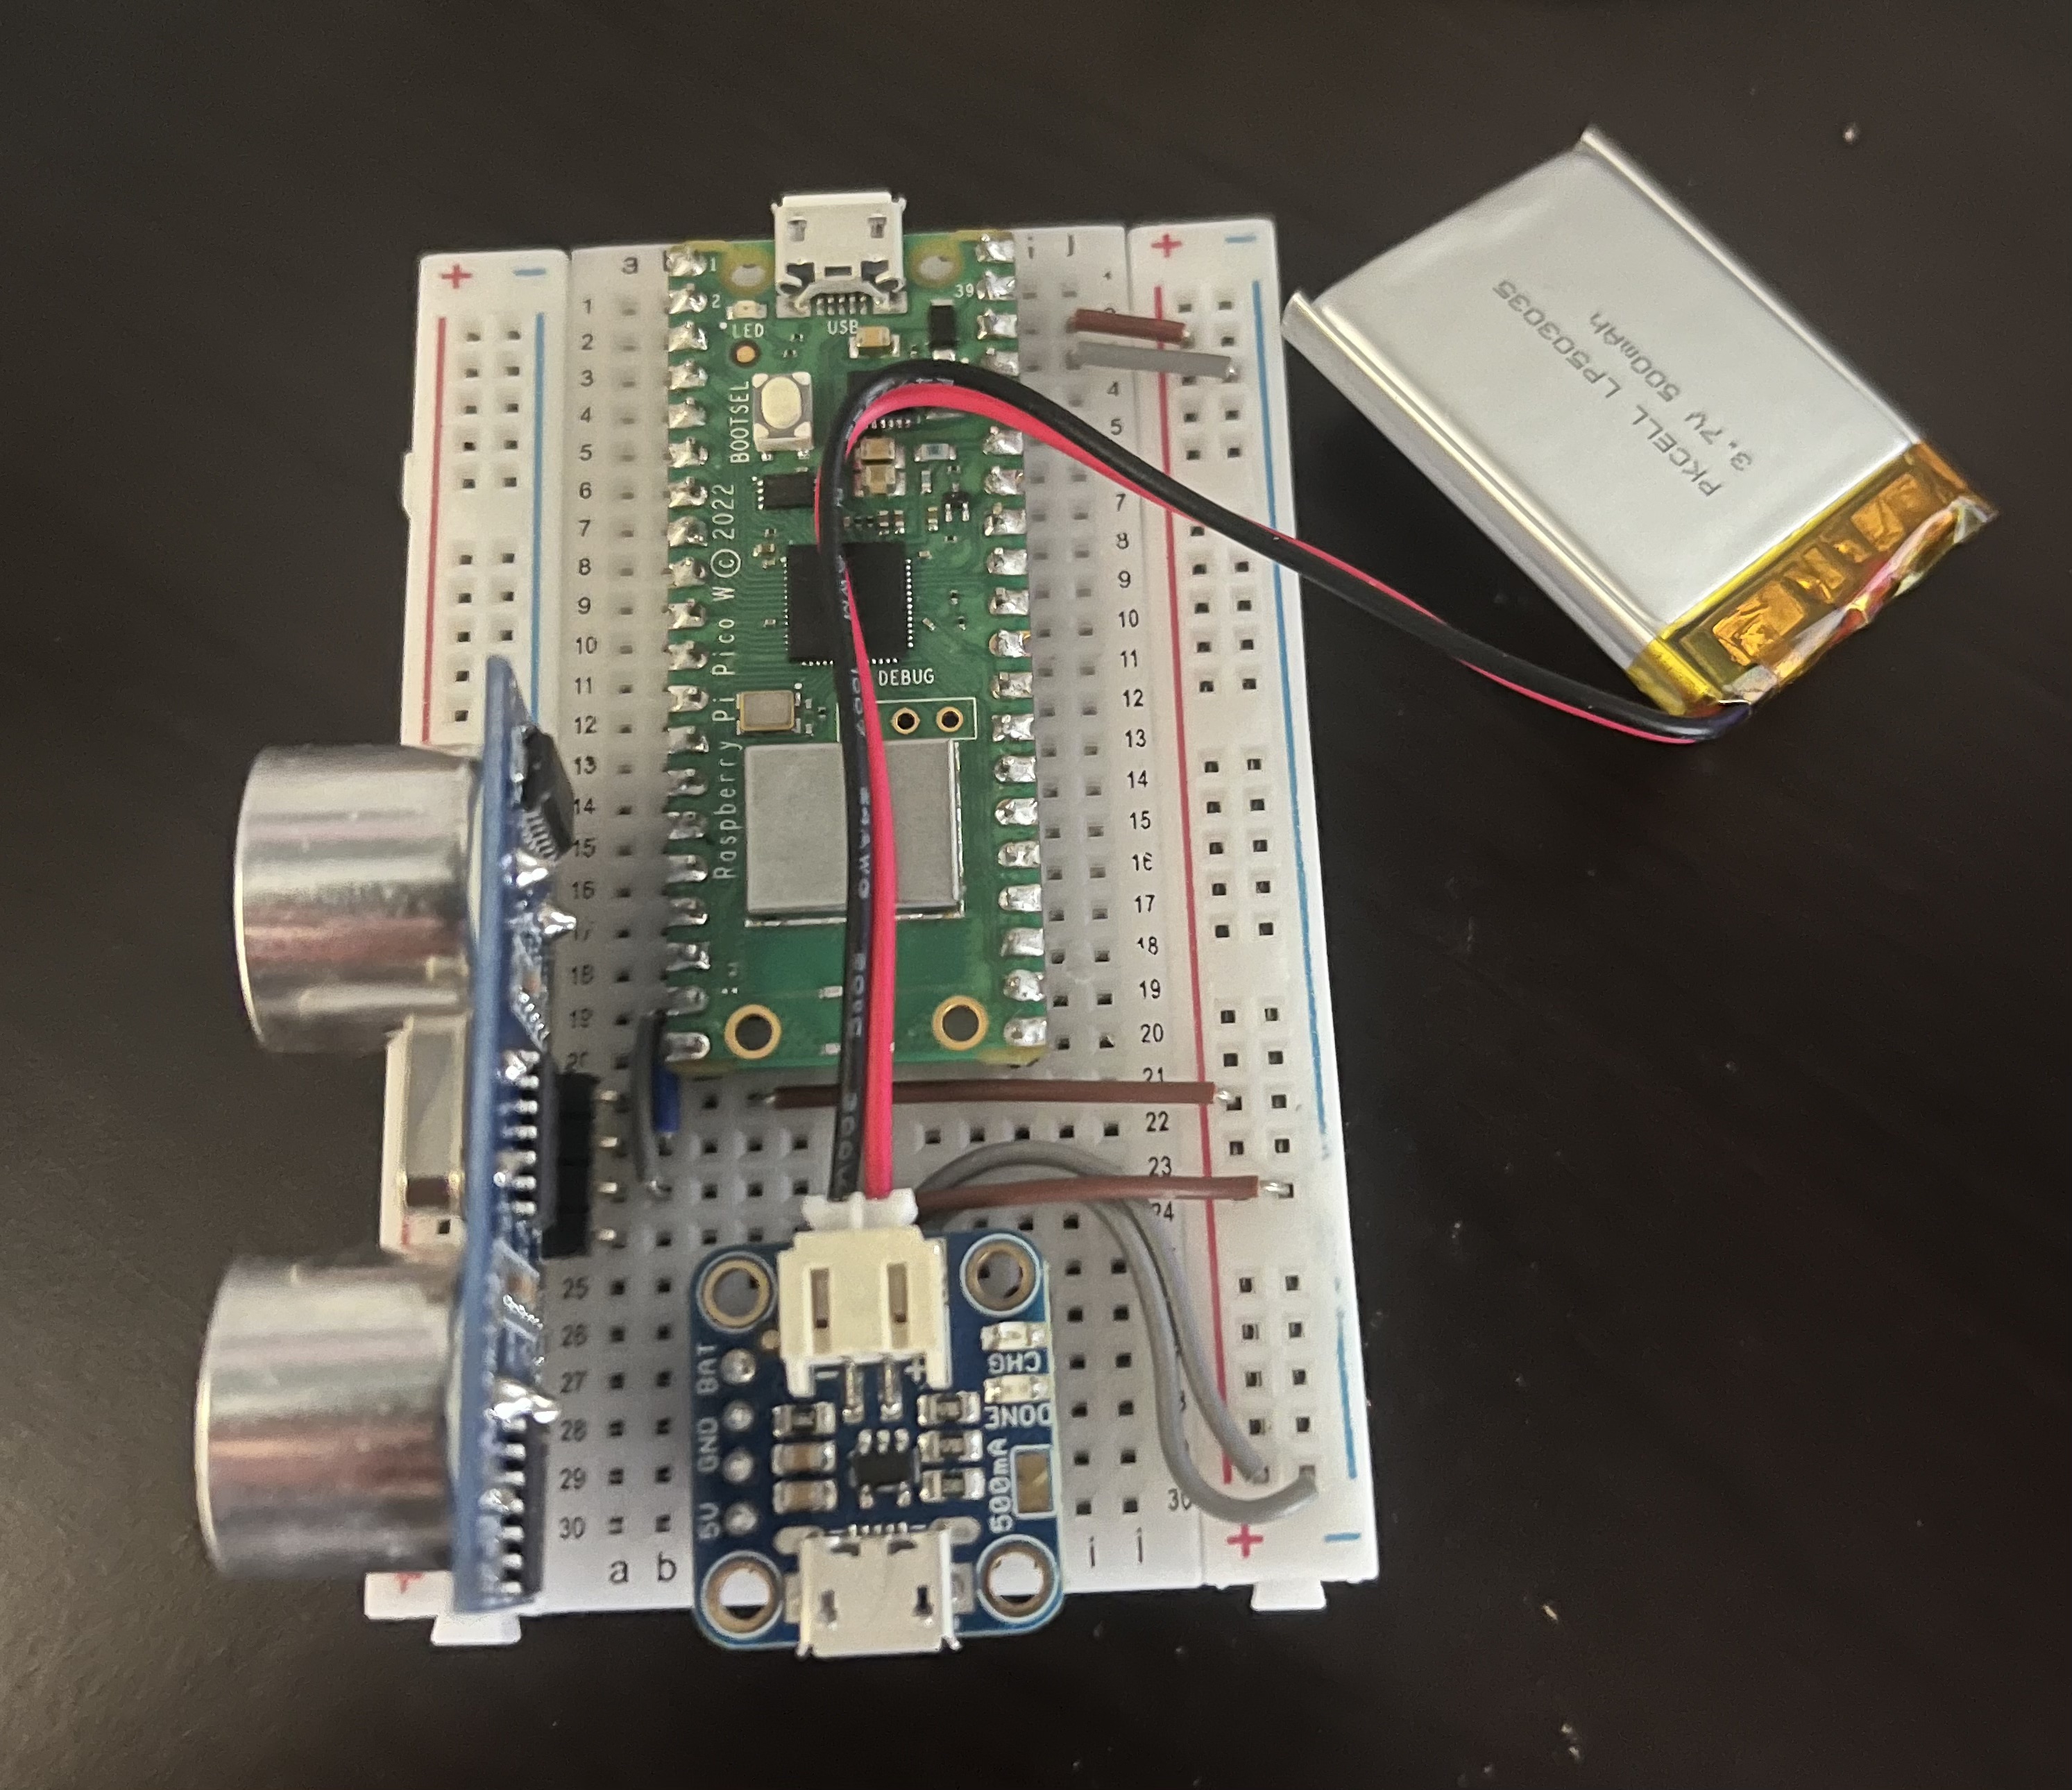
Microcontroller - Raspberry Pi Pico W
This board features plenty of GPIO pins, an RP2040 microcontroller, and importantly, wifi connectivity. This board is also compatible with micropython, which simplifies the programming significantly.
Distance Sensor - HC-SR04
This sensor measures distance using ultrasonic sound waves. It has a range of 2cm - 400cm.
Battery - Lithiun Ion Polymer Battery
This battery has a 3.7v output and a capacity of 500mAh.
Charging Module - Adafruit Micro-Lipo Charger
This charging module has a MicroUSB port which charges the lipo battery at 500ma.
Sensor Hardware Design
Below is all of the components assembled on a breadboard. I didn't make a custom PCB for this project, so this breadboard eventually sits directly in the sensor case. The Adafruit Micro-Lipo Charger provides the board with power and ground from the lipo battery. The Pi Pico W recieves power through its VSYS pin. The ultransonic distance sensor also recieves power, and is connected to the Pico W via the Trigger and Echo pin. I chose to place these signals on GPIO 14 and 15.
Sensor Software Design
For the parking sensors software, I used two helper modules. One of which is the simple.py module from the Micropython library. This module handles the MQTT connection. The next module I used is an HCSR04 module from Autodesk Instructables, which simplifies the collection of distance information from the sensor.
The software first initializes the wifi connection, and then connects as a publisher to my MQTT broker. I then initialize the sensor module, and start the main program loop. The software measures the distance every 5 seconds, and if it detects an object, it publishes a 1 to the topic pico1/distance.
I encountered two major issues during the design process of the software:
- The distance sensor is designed to run at 5v, and since my lipo battery supplies 3.7v, the maximum detection range was signicantly reduced. When the detection range is too far, the sensor measures a negative distance value. Therefore, I can get around the maximum distance issue by signaling a detection whenever a positive distance value is measured.
- I discovered that whenever I initialized my subscriber, it would not see messages from the Pico W until it re-subscribed as a publisher to the topic. To solve this issue, I decided to have the Pico W refresh its MQTT connection at an interval of 30 seconds.
Below is the micropython file used to control the parking sensor.
# File: main.py

import asyncio
import network
import time
from hcsr04 import HCSR04
from umqtt.simple import MQTTClient

# WiFi credentials
WIFI_SSID = "---------"
WIFI_PASSWORD = "------------"

# MQTT broker configuration
MQTT_BROKER = "-----------"
MQTT_CLIENT_ID = "pico1"
MQTT_TOPIC = "pico1/distance"
MQTT_USERNAME = "--------"
MQTT_PASSWORD = "--------"

# Global variable to indicate object detection
DETECTION = 0

# Initialize ultrasonic sensor (GPIO15 trigger, GPIO14 echo)
sensor = HCSR04(trigger_pin=15, echo_pin=14, echo_timeout_us=10000)

def connect_to_wifi(ssid, password):
    """Connects to the specified WiFi network."""
    wlan = network.WLAN(network.STA_IF)
    wlan.active(True)
    wlan.connect(ssid, password)

    while not wlan.isconnected() and wlan.status() >= 0:
        time.sleep(1)  # Fixed: used time.sleep instead of undefined sleep()

    #print("WiFi connected:", wlan.ifconfig())

async def measure_distance():
    """Measures distance continuously and updates the DETECTION variable."""
    global DETECTION
    while True:
        distance = sensor.distance_cm()
        DETECTION = 1 if distance > 0 else 0
        await asyncio.sleep(5)  # Read sensor every 5 seconds

def setup_mqtt():
    """Initializes and connects the MQTT client."""
    client = MQTTClient(
        client_id=MQTT_CLIENT_ID,
        server=MQTT_BROKER,
        user=MQTT_USERNAME,
        password=MQTT_PASSWORD,
        keepalive=180
    )

    try:
        client.connect(clean_session=True)
    except Exception as e:
        # If desired, you can uncomment the line below for debugging
        # print("MQTT Connection Error:", e)
        pass

    return client

async def main():
    """Main program loop: handles WiFi, MQTT, and publishing detection state."""
    connect_to_wifi(WIFI_SSID, WIFI_PASSWORD)
    mqtt_client = setup_mqtt()
    last_refresh = time.ticks_ms()

    # Start background task for distance measurement
    asyncio.create_task(measure_distance())

    try:
        while True:
            now = time.ticks_ms()

            # Refresh the MQTT connection every 30 seconds
            if time.ticks_diff(now, last_refresh) >= 30000:
                try:
                    mqtt_client.disconnect()
                except Exception as e:
                    # Uncomment below for MQTT disconnect errors
                    # print("Error during MQTT disconnect:", e)
                    pass
                mqtt_client = setup_mqtt()
                last_refresh = now

            # Publish detection state to MQTT topic
            message = b"1" if DETECTION else b"0"
            mqtt_client.publish(MQTT_TOPIC, message)

            await asyncio.sleep(10)  # Wait 10 seconds before next publish

    except KeyboardInterrupt:
        mqtt_client.disconnect()
        # print("Exiting...")  # Uncomment for exit confirmation

# Run the program
asyncio.run(main())
MQTT Broker Configuration
My broker service is running on my Raspberry Pi 5. Configuring this system was a bit confusing to understand.
First, I installed and ran the mosquitto service using the following two commands:
sudo apt install -y mosquitto mosquitto-clients
sudo systemctl enable mosquitto.service
Next, I navigated to the conf.d folder within Mosquitto, and added a new file called pwfile.conf. This file will tell the broker what port to listen to, and where the MQTT username and password will be located.
# File: pwfile.conf
listener 1883
password_file /etc/mosquitto/pwfile
Next, I created the password file using the following command:
sudo mosquitto_passwd -c /etc/mosquitto/pwfile admin
Finally, I restarted the Mosquitto service using the following command:
sudo systemctl restart mosquitto.service
Now, I can use the MQTT client to connect to the broker using the username and password I created.
MQTT Subscriber and Website Design
I chose to use python for the frontend of this project, enabling me to get the data from the sensor and display it on a webpage in the same file. This can be done by leveraging two powerful python modules: PAHO-MQTT and Streamlit. PAHO-MQTT allows you to write a script that connects to the broker and subscribes to the topic Pico1/Distance. Streamlit allows for the creation of speedy user interfaces written with python. This was the perfect choice for the project because it was easy to integrate with the MQTT subscriber.
The source code for the subscriber and web UI can be found on github here: 133_parking
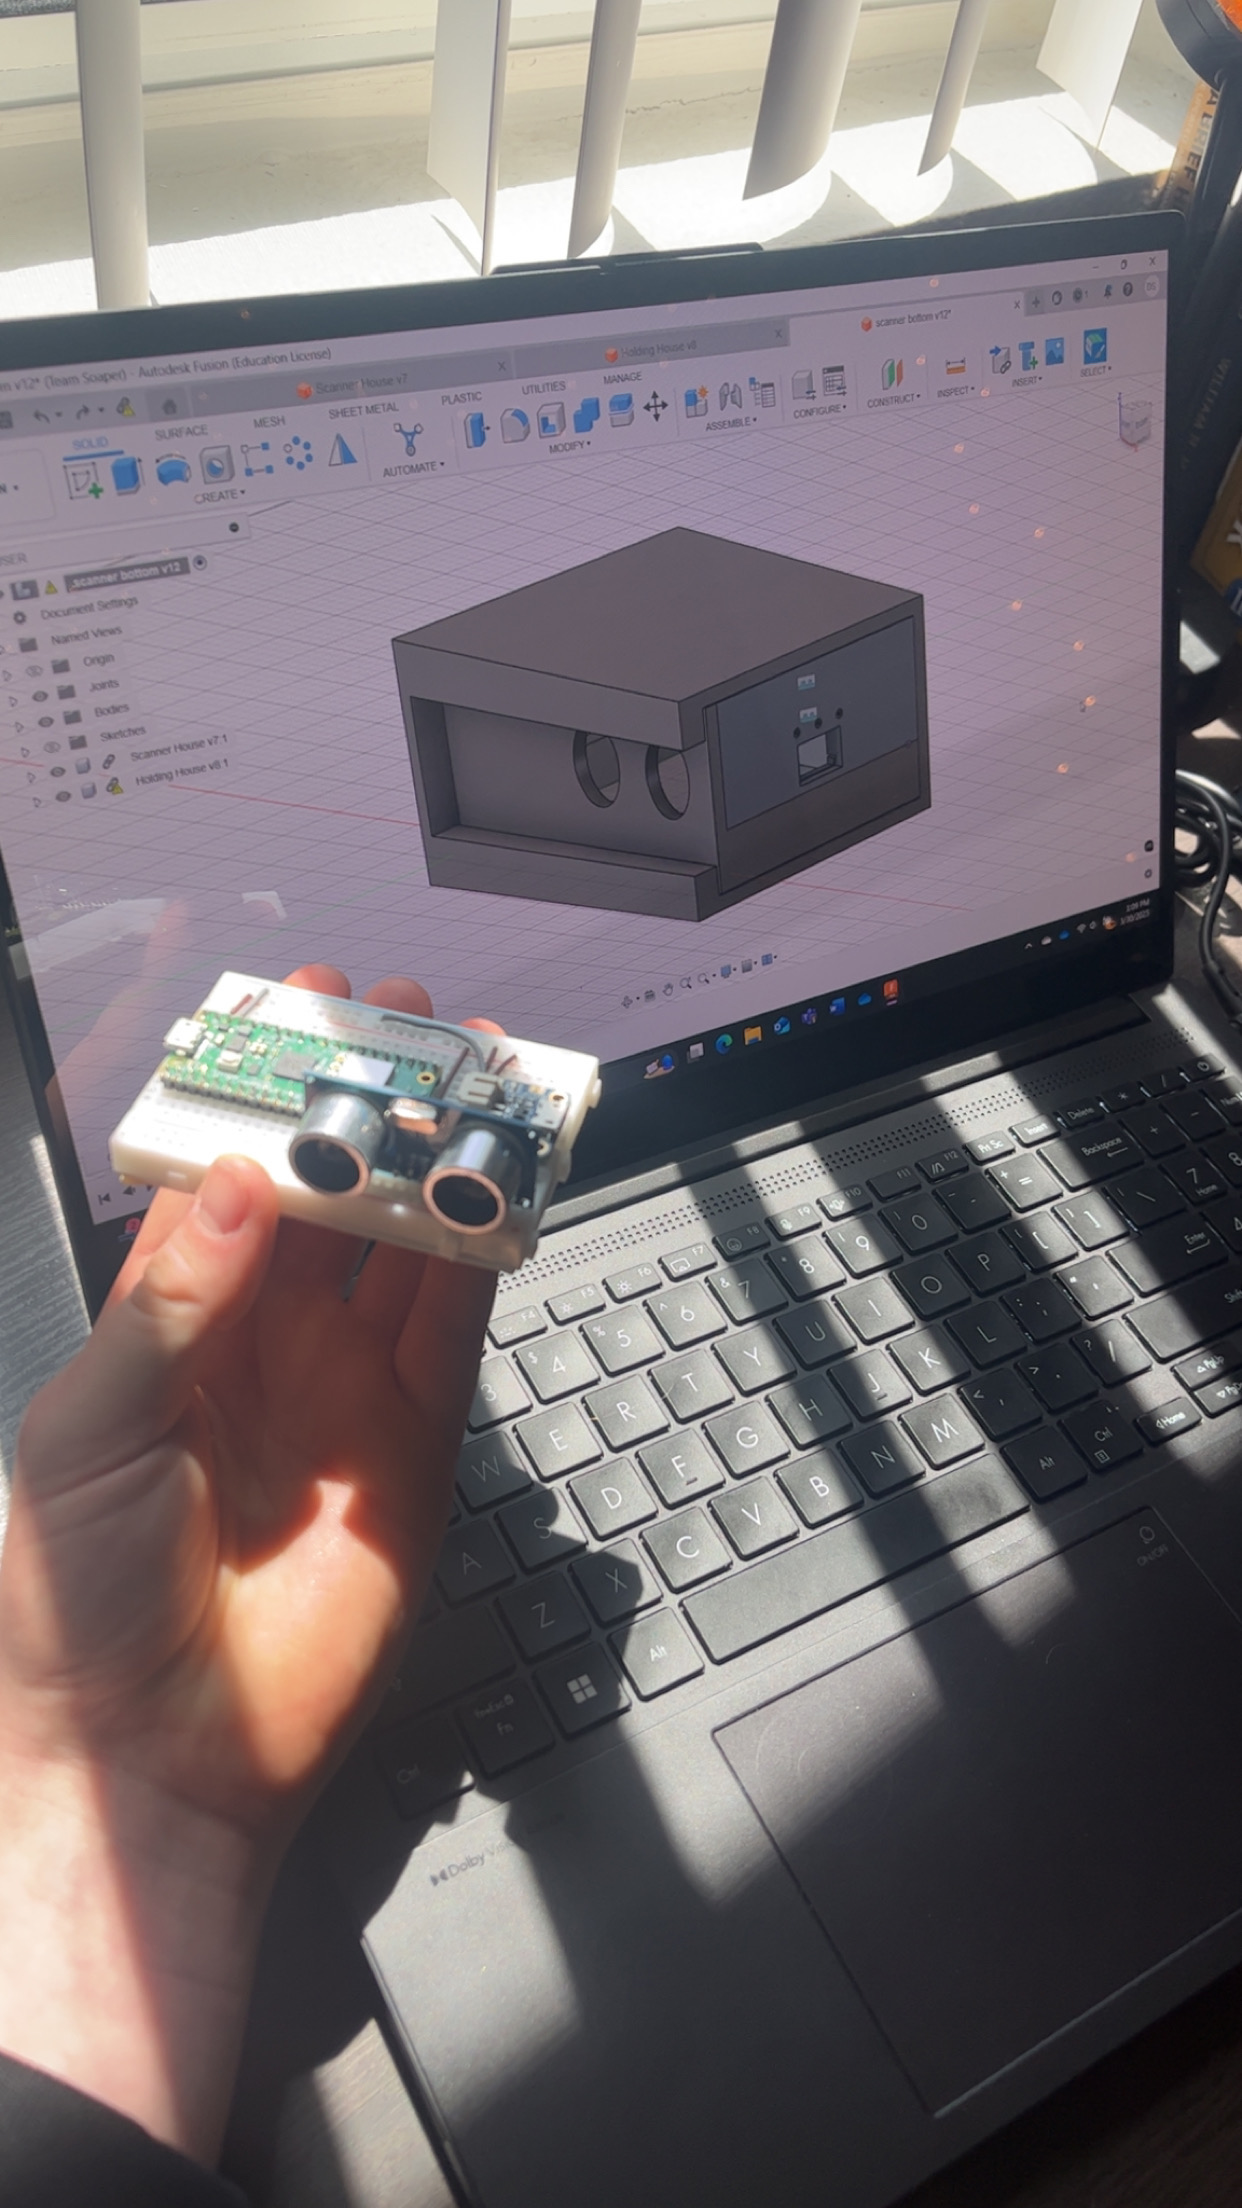
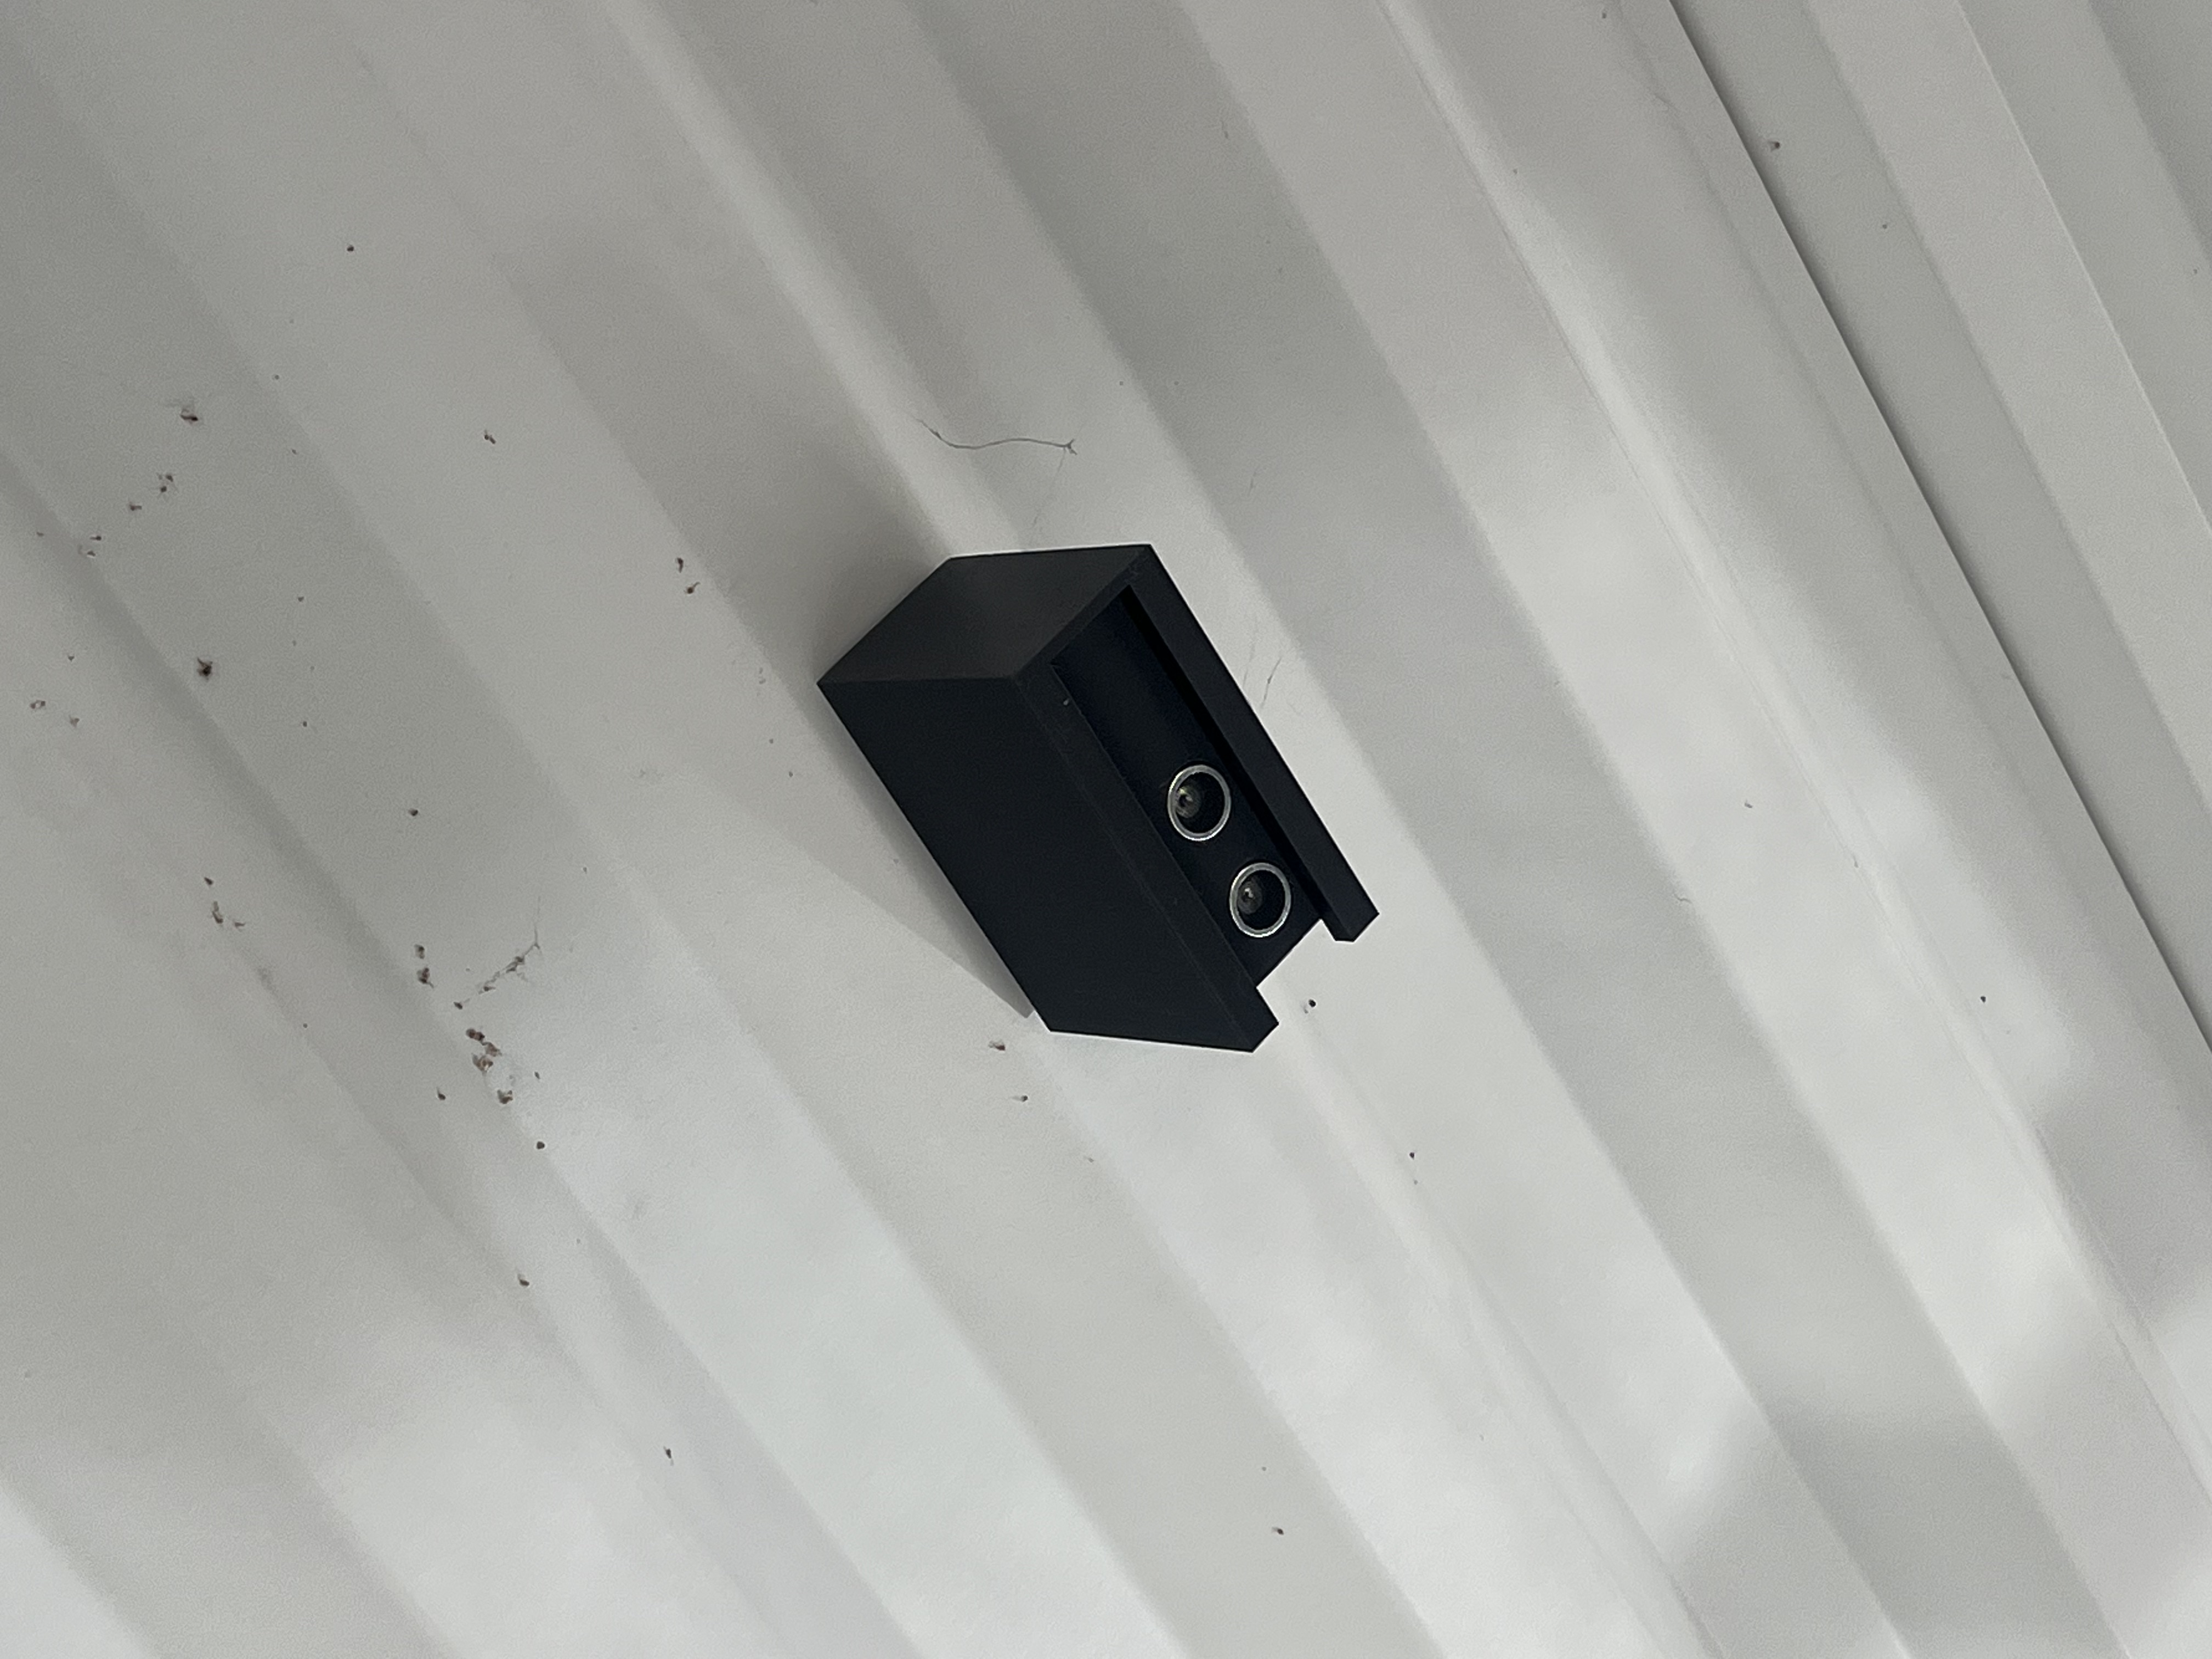
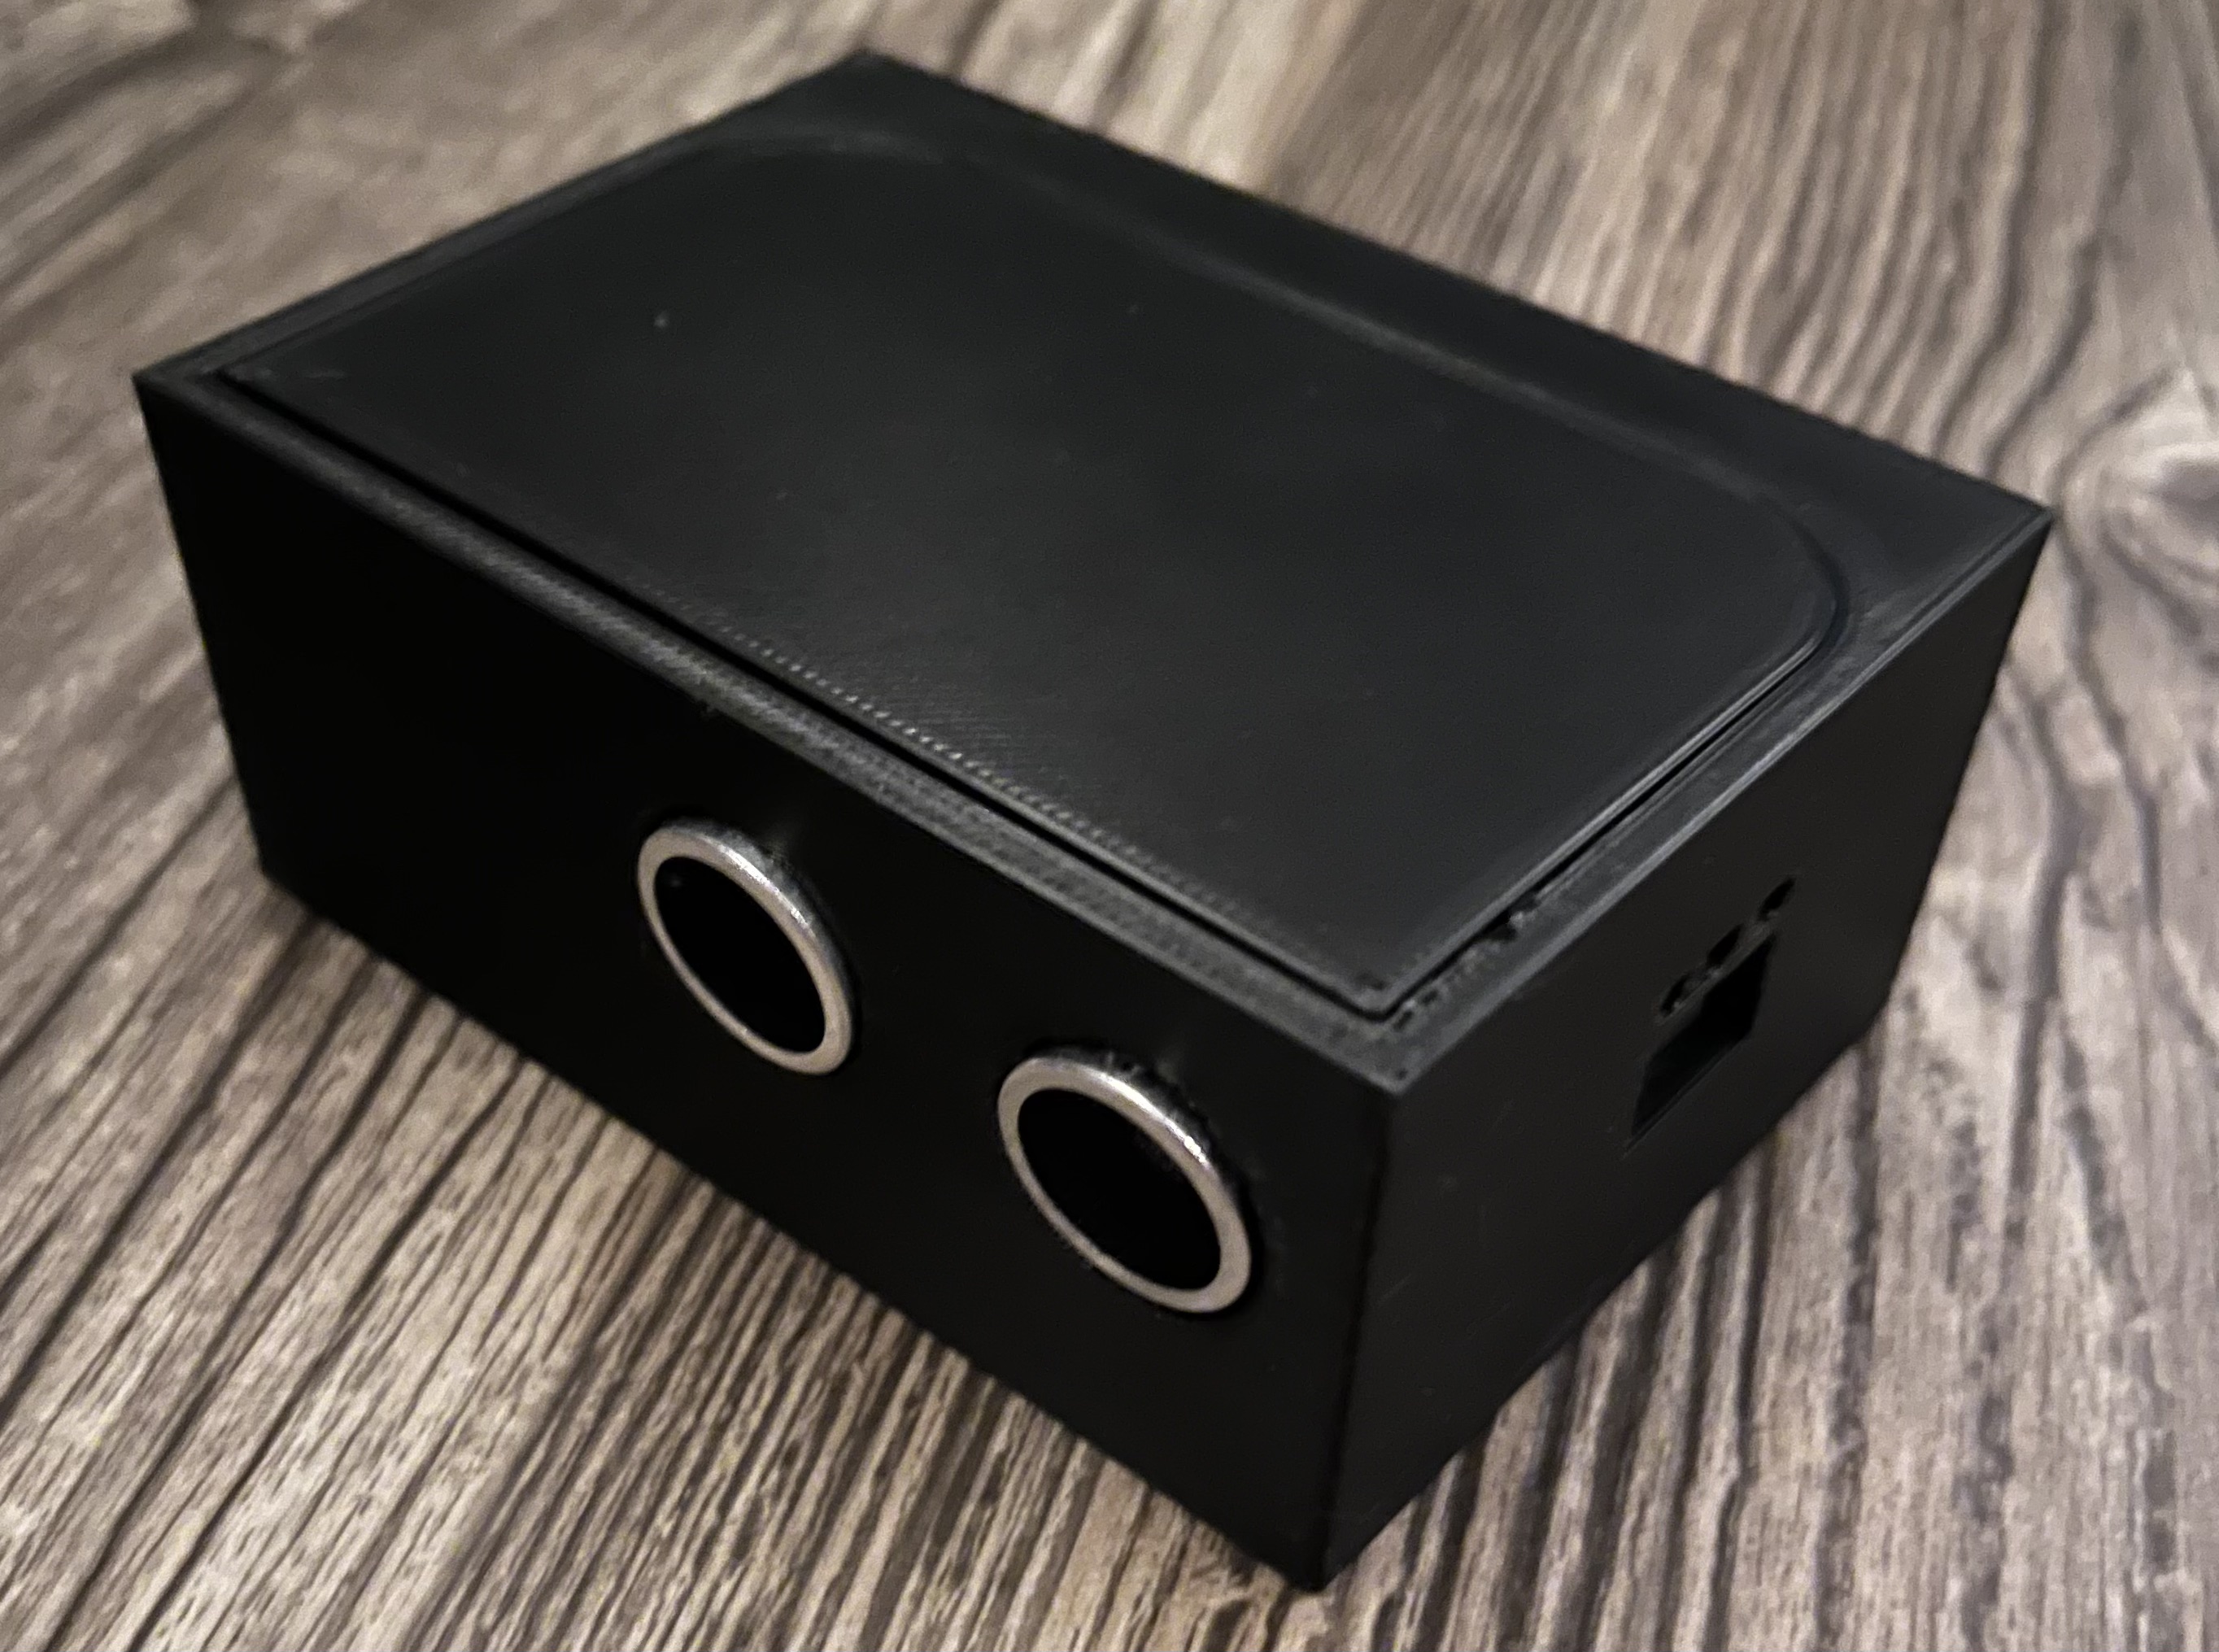
Case Design
I wanted to create a case to house my project, and keep it securely in place over my covered parking spot. There were a few primary requirements for my first prototype:
- Housing component that will remain attached to the covered spot at all times.
- Removable sensor module that slides into the housing component.
- Holes for HCSR04.
- Holes for charging and reprogramming Pico W.
- Removable lid to access hardware components.
My roommate is very skilled using Autodesk Fusion and helped me create a CAD of the prototype in only a few hours. Below on the left is a picture of the initial design. Whenever I got this first prototype printed, I encountered a few immediate problems. The breadboard did not fit in the case, the charging holes were slightly off, and the dovetails used to hold together the sliding components were not pronounced enough, preventing the modules from connecting securely. A short redesign and reprint later, and the new case fit perfectly. The two pictures in the middle and on the right show the final case.
Overall, I am very happy with how this project turned out. I learned a lot about the MQTT protocol, and how to use it to communicate between devices. I also learned a lot about the Pi Pico W, and how to use it with micropython. The website is currently live, and can be found at the link: 133_parking